Managing Agents
Braide manages the full lifecycle of AI agents on your machine. All agent management happens through the Settings panel.
Agent Authentication
Braide does not manage authentication for the agents it runs. Signing in, API keys, and OAuth flows are handled by each agent's own client — exactly as they are when you run that agent outside Braide. Braide launches the agent and speaks the ACP protocol to it; it never sees or stores your agent credentials.
Authenticate your preferred agent with its own client before enabling it here. Consult the agent's own documentation for how — its Website and Repository are linked from its entry in the active registry, and the steps are usually a one-time command-line sign-in or an API key set in your environment.
If you create a session or send a prompt before the agent is authenticated, the agent returns an authentication error and Braide surfaces it in the session — there is no sign-in prompt to complete inside Braide, because authentication lives with the agent's client. The message tells you to consult the agent's documentation and authenticate with its client outside Braide, then try again, and includes the agent's Website and Repository links when its registry entry provides them.
When an agent reads its credentials from an environment variable (for example JUNIE_API_KEY), export it from your shell profile (~/.profile, ~/.zprofile, PowerShell $PROFILE, …). Braide captures your login-shell environment at startup and passes it to every agent it spawns, so the variable reaches the agent even when you launch Braide from the Dock or a desktop launcher rather than a terminal. See Login-shell environment for details and caveats.
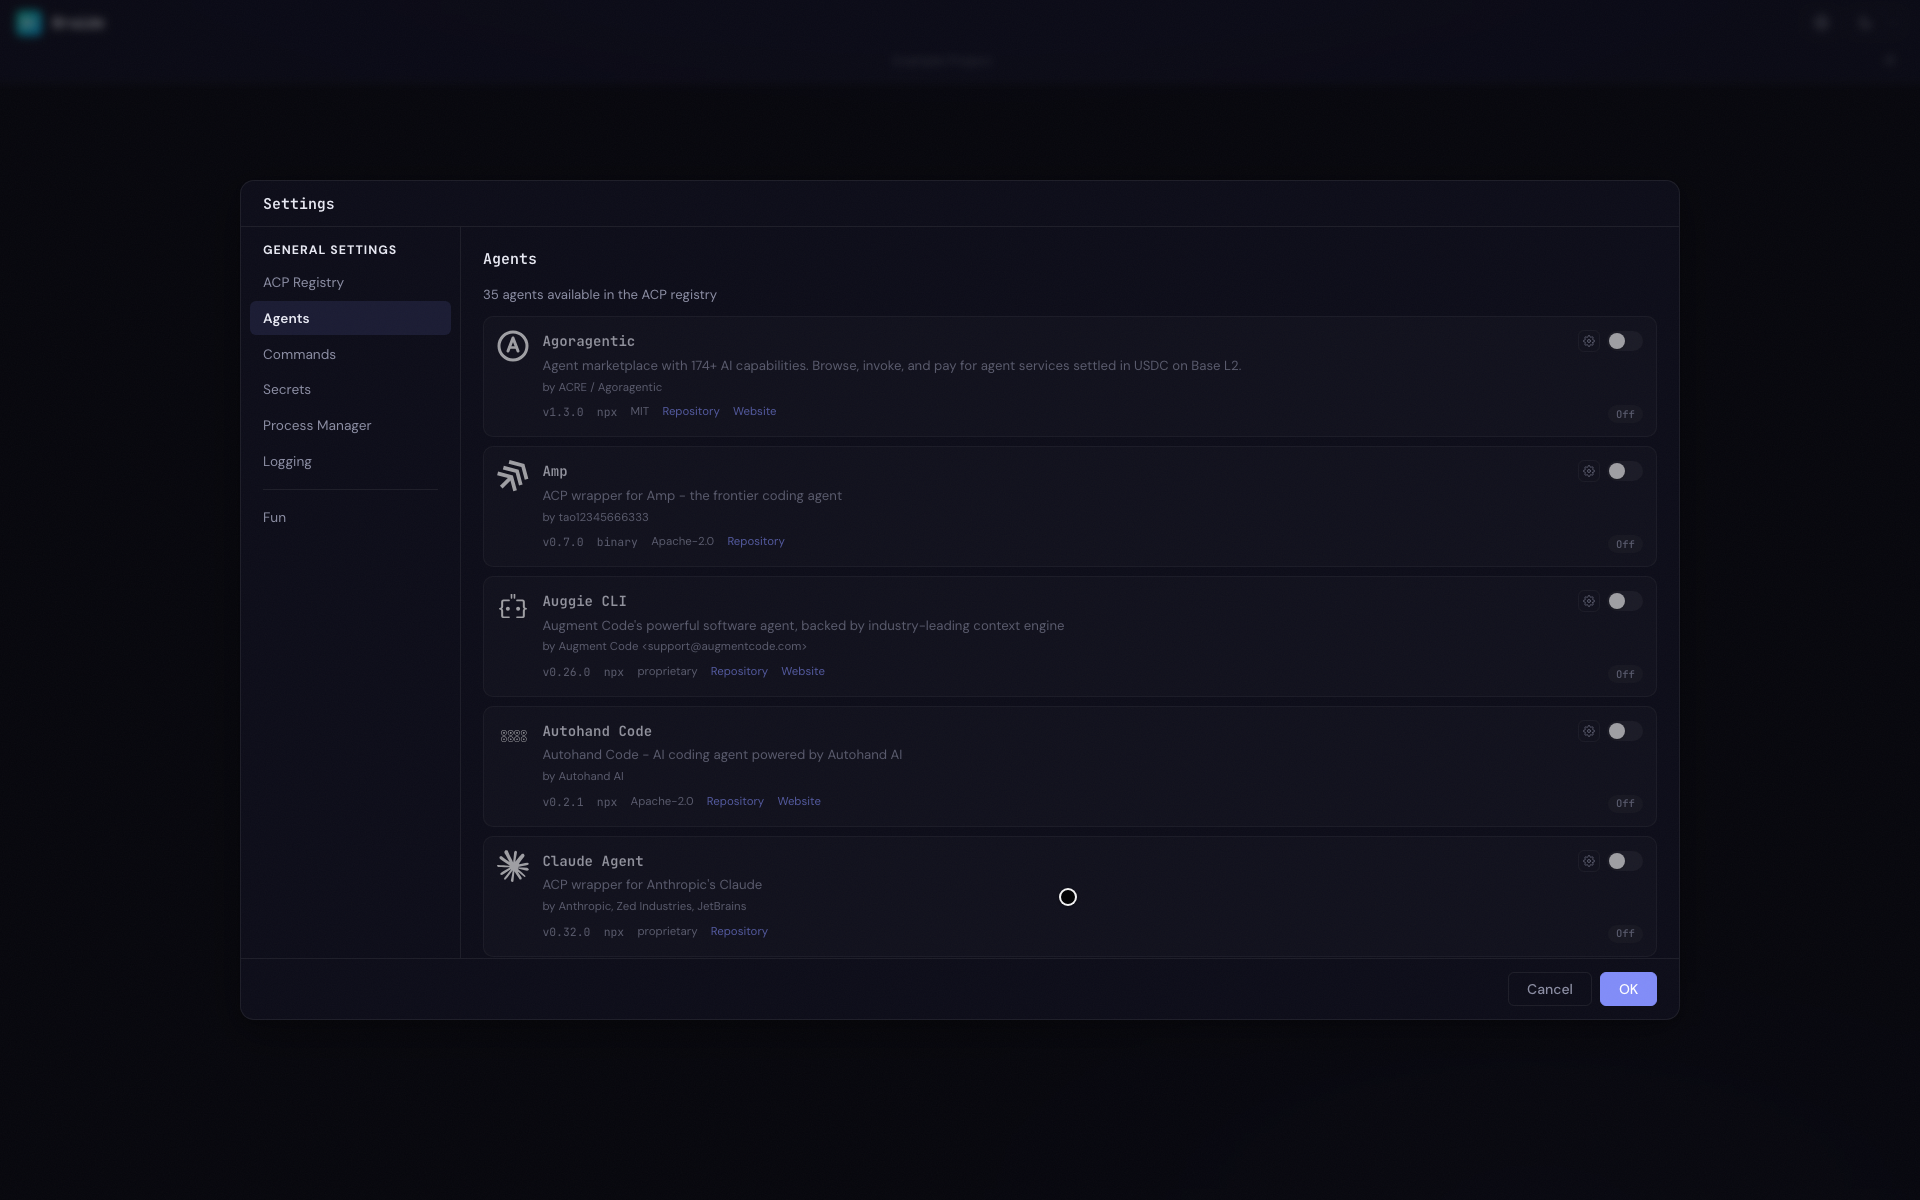
Opening Agent Settings
- Click the gear icon in the top-right of the navigation bar
- Select the Agents section
Enabling and Disabling Agents
Toggle an agent on to enable it. When enabled:
- The agent package is downloaded from the active registry (if not already installed)
- The package is extracted and prepared
- The agent starts and becomes available for sessions
You'll see progress indicators during download and extraction.
Toggle an agent off to disable it. This stops the agent process and prevents it from starting automatically.
Upgrading an Agent
When the active registry advertises a newer version of an enabled agent, an Upgrade button appears beside the version label, with the registry version shown next to the installed one (for example v1.2.0 → v1.3.0).
Clicking Upgrade does the following:
- Confirms with you first if sessions are active. If the agent process is currently hosting one or more open ACP sessions, Braide shows a confirmation dialog naming the agent and the number of sessions that will be interrupted. The agent must restart to pick up the new version, so any session attached to the running process will need to be paused and resumed before continuing. If you cancel the dialog, nothing happens — the existing version keeps running. If no sessions are open, the upgrade proceeds without prompting.
- Stops the running agent. Any open sessions receive a session-close request (when the agent supports it), giving the agent a chance to persist state before the process exits.
- Installs the new version if needed. Binary-distributed agents are downloaded and extracted at this point;
npx/uvxagents are resolved from their package cache. The status indicator reflects the current phase. - Starts the new version. Any Additional Settings (agent meta) you have saved are reapplied automatically, so the Apply button does not appear after a successful upgrade. If the start fails, the previously installed version is restored so the upgrade affordance reappears and you can retry.
Existing sessions are recovered transparently after the restart — see Session Recovery for details.
Switching Versions
Braide keeps a version history for every enabled agent. Each time it queries the active registry it records the complete registry entry for any version it sees into a store on disk, so the version picker can offer every version the app has ever seen for that agent — not only the ones currently installed. This works the same way for all distribution methods (binary, npx, and uvx), so version selection is universal rather than limited to downloaded binaries. See Agent version history for where the store lives.
When more than one version is known for an enabled agent, a version selector appears beside the version label (v1.3.0 ▾). Click it to open a Switch version dropdown listing every known version, newest first, with the one in use marked (current).
Picking another version stops the running agent and starts the selected version with the same Additional Settings. If the version isn't already available locally, Braide fetches it first — a binary is downloaded and extracted, while npx/uvx agents re-resolve the exact pinned version from their package cache. If the start fails, the previously running version is restored.
The selector also appears — even while the agent is disabled — whenever a downloaded binary is present, so the per-version delete control below stays reachable.
Deleting a Downloaded Version
Inside the version dropdown, any version whose binary is downloaded on disk shows a trash icon. Clicking it opens a confirmation dialog before anything is removed:
Delete v1.2.0 of Claude Code? The downloaded files are removed from disk. The version stays in the list and will be downloaded again if selected later. If it is the version currently in use, the agent falls back to another downloaded version or is disabled.
So deleting only reclaims disk space — it never removes the version from the picker. A deleted version reappears in the list flagged as not downloaded and is re-fetched on demand the next time you select it. If you delete the version the agent is currently running, Braide stops it and falls back to another downloaded version, or disables the agent when none remain.
Use delete when a download is corrupt or truncated and you want to force a fresh fetch, or when you no longer need an older version on disk.
Agents distributed via npx or uvx never show the trash icon — those runtimes manage their own package cache, so there are no Braide-managed files to remove. Their versions remain selectable from history and are re-resolved from the package cache when chosen.
Agent Status Indicators
Each agent shows a color-coded status:
- Off — Not enabled
- Downloading / Extracting — Being installed
- Starting — Process is launching
- Running — Ready to accept sessions
- Error — Failed to start; hover or click to see the error message
An agent with no compatible build for your operating system and architecture stays in the list but cannot be enabled: it shows an Unsupported on this platform pill and its enable toggle and cog (Additional Settings) button are disabled. This is distinct from Error — the agent never starts because there is no npx/uvx launcher and no binary keyed for your platform, rather than failing at launch. See Agent binary distribution keys for how compatibility is determined.
If the error mentions a missing command-line tool (for example, npx is not installed or not on PATH for an npm-distributed agent), open Settings > System Dependencies for the current install status of git, node, npx, and gh, along with download links. See Settings > System Dependencies for the minimum versions Braide expects.
Additional Settings (Agent Meta)
Each enabled agent card in Settings > Agents has a cog icon beside the on/off toggle that opens the Additional Settings dialog. This dialog lets you attach arbitrary JSON settings to each session the agent runs.
Agents are free to read these values to enable tenant tagging, debug flags, feature toggles, routing hints, tracing IDs, or any other agent-specific context. Agents that don't recognise a key simply ignore it, so setting these values is safe even for agents that make no use of them.
Check your agent's ACP support for details of any supported metadata.
Editing the JSON
The dialog shows a single textarea containing a JSON object. Keys and values are entirely agent-specific — consult the agent's documentation for what it expects. The editor has a few ergonomics to make hand-editing easier:
- Tab inserts two spaces at the caret instead of shifting focus out of the textarea.
- Shift+Tab falls through to the browser default so you can still leave the field with the keyboard.
- Selecting some text and pressing the double-quote key wraps the selection in quotes rather than replacing it.
Invalid JSON is rejected on save with an inline error. An empty object ({}) is treated as "no settings" and the agent runs with nothing extra attached.
Applying Changes
Unlike most settings, changing the JSON does not automatically restart the agent. Active sessions would be interrupted by a surprise restart, so the app surfaces the change instead of enacting it.
When the saved JSON differs from the settings the running agent was started with, an Apply button appears on the agent card. Clicking it gracefully stops the agent and starts it again with the new settings. The button hides itself once the restart settles. If no agent is running yet, simply enabling the agent is enough — the saved settings are used on first start.
Scope
The stored settings are per-agent and global: they apply to every session and project that uses that agent. They are applied once per session at creation time, so the agent can associate them with that session's state. See the Configuration reference for the file layout.
Process Isolation (Shared vs Per-Session)
Most agents run as a single shared process: enabling the agent starts one process, and every session attached to that agent talks to it. This is efficient and matches how all agents have historically run.
Some agents work better — or only work — when each session has its own dedicated process. The Per-session process isolation toggle in the agent's Additional Settings dialog opts that agent into this mode.
How it works
| Mode | When you enable the agent | When you create a session | When you delete a session |
|---|---|---|---|
| Shared (default) | One process starts, ready for any session | Session attaches to the shared process | Session detaches; process keeps running |
| Per-session | Nothing starts (no shared process) | A dedicated process is spawned with cwd set to the session's worktree, then ACP initialize runs | The dedicated process is stopped when the session is deleted |
Per-session is the right choice when:
- The agent expects to be the only client of its process (e.g. it caches per-session state in memory).
- The agent's behaviour depends on the working directory — running in the worktree means the agent sees the session's checkout directly, with no need to pass paths around.
- You want session-scoped resource isolation (a hung agent can be killed without affecting other sessions).
The status pill on the agent card reads "Enabled" instead of "Running" when the agent is configured per-session — there is no long-lived shared process to call "running".
Recommended defaults
Some agents declare per-session as their preferred mode. When you open the Additional Settings dialog for one of these agents, an inline (recommended) label appears next to the toggle. Currently the only agent in this list is Junie.
You can override the recommendation with the toggle.
Switching modes
Toggling the isolation setting in the Additional Settings dialog and clicking Save persists the change immediately. A confirmation dialog explains what happens to any processes that are currently running:
- Shared → Per-session. The shared process is stopped after settings save. New sessions will each spawn their own dedicated process. If sessions are currently attached to the shared process, they will be interrupted; the dialog tells you the count.
- Per-session → Shared. New sessions will use a single shared process. Existing per-session processes stay alive until their sessions end naturally — they are owned by their sessions, and tearing them down would be a surprise interruption.
Applying configuration changes
Changing the agent's Additional Settings JSON behaves differently for per-session agents:
- Shared. Clicking Apply stops and restarts the shared process with the new settings (the existing behaviour).
- Per-session. Clicking Apply opens a confirmation that says the change only affects new sessions; existing sessions keep their current configuration. Confirming clears the Apply button without restarting any process.
Per-instance rows in the Process Manager
When per-session agents are running, the Process Manager lists one row per dedicated process. Rows are labelled <Agent name> · session <short-session-id> and grouped together with any shared instance of the same agent. Clicking Stop on a per-session row releases just that session's dedicated process — it does not disable the agent.
Resume after app restart
When you restart Braide, per-session processes are not respawned automatically. The next time you send a prompt to a per-session session, Braide spawns a fresh dedicated process and asks the agent to session/load so it picks up where the original session left off.
If the agent does not advertise session/load capability, the prompt fails with "Per-session agent does not support session/load — this session cannot be resumed after the agent process restarted." This protects you from silently losing context: a per-session agent without session/load cannot recover its in-memory session state, and creating a fresh ACP session under the same id would discard it.
Managing Registries
Agents are discovered through registries. To manage registries:
- Go to Settings > ACP Registry
- The default registry is pre-configured and cannot be removed
- Click Add Registry to add a custom registry URL
- Click Set Active to switch which registry is used
Only one registry is active at a time. Changing the active registry updates the available agent list.
Process Manager
The Process Manager section in Settings provides a fallback for when something gets stuck — for example, an agent that has become unresponsive or a terminal session that hasn't cleaned up.
It lists all active processes with color-coded badges:
- Agent (blue) — Agent processes managed by Braide
- Terminal (green) — Shell sessions attached to sessions
- Command (yellow) — Client terminal connections
Each entry shows the process label, version (for agents), and the underlying command. You can stop any process directly from this view. The list refreshes automatically.